Set up is important. Use the brake pad that the manufacturer recommends. This important for performance as well as durability and believe it or not, warranty issues. If you ride Reynolds, use a Reynolds pad. Edge composites has a new pad for their rims but they have typically been shipped with Swissstop Yellow pads. Some manufacturers don't make their own pad so look into what they recommend. When there is no specific recommendation, we suggest Swissstop based on our own personal results with these pads. Adjustment of the pad is important too. Carbon rims tend to pulse or squeak more than aluminum rims so getting the pad adjusted just right will make things work much better. A small amount of "toe-in" is required. "toe-in" is an adjustment that allows the front edge of the brake pad contact the rim first. Only the slightest amount is necessary. Those of you who remember cantilever brakes on mountain bikes are familiar with this adjustment.
Keep it clean! Over time, carbon rims will accumulate a bit of brake pad material and they will "glaze up". This is when, under hard braking, the pad and rim heat up enough that pad material literally melts onto the rim. The surface of the pad will become hard and the rim will have a film on it. Remove this using a scotch bright pad and a little rubbing alcohol. The rubbing alcohol will help remove oils and will clean the rim well in general. Don't use sand paper on your carbon rims!!! Clean the brake pads using, yes, sand paper. Inspect them and make sure there are no bits of debris stuck in the pad as they will likely cut into your rim while you're braking. The one thing you should do the most often is look at the pads and keep chunks of stuff out of them. Keeping the wheels clean will also allow you to see any cracks or other problems early.
Most carbon rims now are really strong and under normal riding conditions, they are as durable if not more durable than some alloy rims. Their weakness is usually due to abnormal impacts or when your riding buddy puts his whole bike and gear on top of your wheels in the trunk of his or her car thank you very much. Treat them with respect, keep sharp objects away from them and don't stack a bunch of bikes and equipment right on top of them in your trunk, thanks again dear friend. Keep your tire pressure accurate as well, this is important for any rim and to avoid pinch flats. Banging a your sidewall on the road isn't good for any rim. If they are out of true, get them serviced. The only other thing to keep in mind is that excessive heat build-up from braking can harm the rims. All this means is that you shouldn't ride your brakes, just ride smart. If you tend to ride your brakes or are a timid descender in general, carbon rims may not be very confidence inspiring.
Personally, I've ridden carbon rims for a few years now and I don't anticipate going back any time soon. The Braking is different but it doesn't bother me. They have been more durable than I would have thought and considering what I've put them through, they are the toughest wheels I've had outside of a good pair of 32 hole handbuilts, which I also have and love. We recommend Enve (formally Edge), Reynolds and HED wheels. Why, because we've seen more broken and cracked rims from the other big players out there than we should even mention.
Here are some photos of the process.
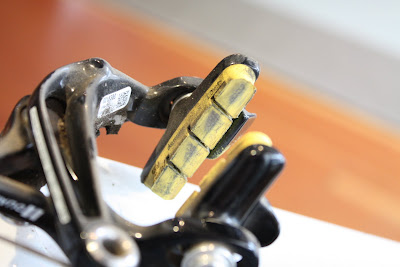
 This is a photo of a moderately glazed brake pad on a very dirty brake.
 Carefully sanding the pad with a medium grit sand paper.
 Voila! A clean pad.
 Your rim cleaning supplies, rubbing alcohol and a small piece of scotch bright pad.
 Cleaning the rim. Now go for a ride!
Good advice, great pictures Aaron. -Neil
ReplyDeleteI just bought a pair of Reynolds clinchers of the Holiday season and I was wondering how to clean them. Thanks for the advice.
ReplyDelete-Jim
good stuff, thanks for the clear pictures as well.
ReplyDelete